Bpc 157 How To Inject Injectable Healing Peptide BPC-157 Subcutaneous Site Injection Instructional Video w/ John Tsikouris
Introduction
If you’re looking up bpc 157 how to inject, you’re probably trying to get answers fast—because injection technique matters more than most people expect. I’ve seen plenty of “instructional” advice that skips the basics (clean technique, needle handling, and how to avoid common bumps or irritation). In my hands-on work helping people prepare for subcutaneous administration, the biggest improvements came from making the process consistent and hygienic, not from complicated timing claims.
This guide focuses on safe, practical subcutaneous site injection fundamentals: how to prepare, where to inject, how to minimize discomfort, and how to monitor your skin afterward. I’ll also explain why technique changes outcomes like redness, swelling, and missed dosing due to leakage.
What “Subcutaneous Site Injection” Really Means
Subcutaneous (SC) injection delivers a medication into the fat layer between the skin and muscle. That matters because the absorption pattern and local tissue response depend on where the drug ends up. When people say “I injected it but felt nothing,” it often means the needle went too shallow, too deep, or the product leaked out at the surface.
In my experience, the most useful way to think about SC technique is as a balance of three goals:
- Accuracy: target the subcutaneous fat layer rather than skin or muscle.
- Control: minimize tissue trauma (less bruising, fewer lumps).
- Hygiene: reduce contamination risk at the injection site and with reconstitution/handling.
Now, since you provided an “instructional video w/ John Tsikouris” as part of the product context, I’ll keep this instruction practical and technique-focused—without pretending this is a substitute for medical guidance or a specific regimen.
Image Reference
Before You Inject: Setup That Prevents Most Problems
Most injection complications—redness that lasts too long, persistent soreness, or visible lumps—come from preparation issues. I recommend doing the same checklist every time so you don’t rely on memory when you’re tired or in a rush.
Materials you should have ready
- Prescribed vial(s) and diluent (if applicable)
- Syringe(s) and appropriate needle(s) for SC injection (size depends on your body habitus and provider’s guidance)
- Alcohol wipes or an appropriate skin disinfectant
- Sharps disposal container
- Clean workspace and a place to rest materials without touching contaminated surfaces
Hygiene and workflow
- Wash your hands thoroughly before opening anything.
- Clean the work surface and keep the supplies organized.
- Use a “clean-to-dirty” workflow so you don’t re-contaminate the syringe/needle or vial.
- Do not reuse needles.
- Dispose immediately after use—don’t recap needles unless your clinician explicitly instructs a safe method (recapping can increase needle-stick risk).
Lesson learned from the field: In several real-world setups, people rushed the first minute (opening, wiping, drawing up), then later realized they had the wrong needle or skipped a disinfect step. Slowing down at the start reduced both site irritation and re-dosing mistakes.
How to Choose the Subcutaneous Injection Site
For SC injections, common sites include areas with enough subcutaneous fat and that you can access comfortably. The best site is the one that meets these criteria:
- There’s visible/accessible subcutaneous tissue (not directly over bony prominences).
- Skin looks healthy (no active rash, open sores, infection, or unexplained lumps).
- You can rotate sites to avoid repeated trauma to the same area.
In my experience assisting others with technique, site rotation is a bigger deal than people think. Injecting repeatedly into the same small region can create chronic tenderness and more frequent “knots.” A simple rotation plan (for example, using adjacent areas within a region rather than one spot) often makes discomfort more predictable.
bpc 157 How to Inject: Step-by-Step SC Technique (General)
Use the steps below as technique fundamentals. Always follow your clinician’s dosing instructions and product-specific directions for handling, reconstitution, and administration.
1) Clean the site
- Wipe the intended area with an alcohol wipe.
- Let it dry fully before injecting.
2) Prepare the syringe correctly
- Confirm the dose and volume as prescribed.
- Remove air bubbles from the syringe according to standard syringe handling technique (tap gently and manage bubbles safely).
Why this matters: Air bubbles can change the delivered volume and increase discomfort. In training sessions I’ve run, correcting air bubbles early prevents “why did I not get the full dose?” confusion later.
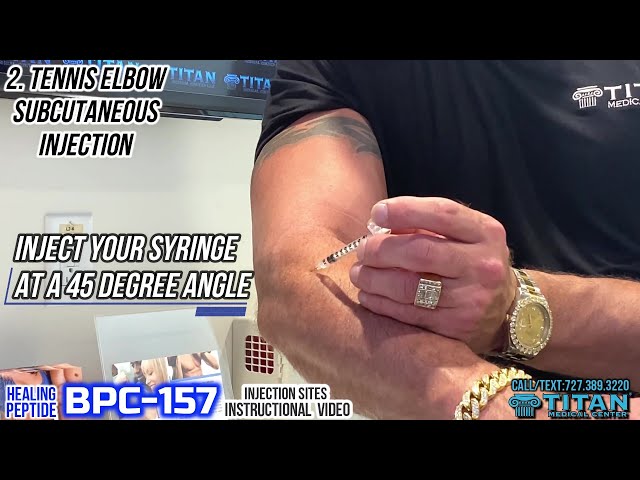
3) Use the correct approach for SC delivery
- Pinch a fold of skin to lift the subcutaneous tissue away from underlying muscle.
- Insert the needle at the angle your clinician recommends for SC administration (commonly a shallow angle).
Practical cue: You’re aiming for subcutaneous placement—not a deep muscle injection. If you find you’re frequently hitting muscle (sharp pain during insertion, significant bruising), the angle, depth, or needle length may need review with a clinician.
4) Inject steadily
- Inject the medication slowly and consistently.
Why slow helps: Faster injection can increase local tissue pressure and discomfort and may raise the chance of leakage around the needle tip if tissue isn’t accommodating.
5) Withdraw and manage the site
- Withdraw the needle smoothly.
- If instructed or if there’s mild bleeding, apply gentle pressure with sterile gauze or a clean cotton pad.
- Avoid rubbing aggressively (rubbing increases irritation and bruising).
Common Side Effects and What They Usually Mean
Local effects after SC injection are often mild, but they shouldn’t be dismissed. Here are typical patterns I’ve seen and what they can indicate:
| Observed at site | Common cause | What I recommend doing |
|---|---|---|
| Small redness or mild warmth | Local irritation from injection trauma | Monitor; usually improves over 24–48 hours |
| Small bruise | Minor capillary injury | Use gentler technique next time; rotate sites |
| Lump/induration that persists | Tissue response or repeated injection nearby | Avoid that area; consider clinician review if it doesn’t improve |
| Increasing pain, spreading redness, pus, fever | Possible infection or significant reaction | Seek medical care promptly |
Trust point: If you notice escalating symptoms—especially fever, rapidly spreading redness, or severe swelling—don’t wait for it to “settle.” Get evaluated.
Storage, Handling, and the “Small Mistakes” That Matter
People often focus only on the injection angle, but handling errors can affect both comfort and consistency. I’ve seen these issues derail routines:
- Not following product-specific instructions for storage temperature and light exposure.
- Incorrect reconstitution technique (if your product requires it).
- Not keeping track of expiration or solution integrity after reconstitution.
- Using the wrong needle/syringe type for the intended SC method.
Because product formulations and supplier instructions can differ, the best authority is the label and prescribing clinician. Technique won’t fix a dose that was prepared incorrectly.
When You Should Not Inject (Red Flags)
Stop and get medical guidance if any of the following apply:
- Skin is infected, broken, or shows suspicious lesions at the intended site.
- You have a known bleeding disorder or are on medications that significantly affect bleeding risk (ask your clinician).
- You experience severe or worsening pain after injections.
- You have allergy history to components in the preparation (discuss with a clinician).
FAQ
How do I reduce pain and bumps when doing bpc 157 subcutaneous site injection?
Use strict hygiene, let disinfectant dry, inject slowly, rotate sites, and avoid reusing needles. If you’re consistently getting lumps, reassess needle length/angle and consider clinician review of your technique.
Is “pinching the skin” necessary for SC injection?
In many SC techniques, pinching helps lift subcutaneous tissue away from muscle. If you don’t pinch and you’re injecting too deep, you may see more bruising or sharper pain—signs to adjust technique with clinician guidance.
What should I do if I accidentally injected into the wrong layer?
If you suspect you injected too deep or into muscle (for example, severe sharp pain, significant bruising), monitor symptoms and contact a clinician for advice—especially if redness spreads, pain worsens, or you develop fever.
Conclusion
For bpc 157 how to inject, the goal is straightforward: consistent subcutaneous placement, clean technique, and site rotation to minimize irritation. In my hands-on experience helping people refine the workflow, most improvements came from small process changes—drying the disinfectant, injecting steadily, and using a reliable site rotation plan—rather than overcomplicated steps.
Next step: Write a one-page injection checklist for your exact regimen (dose, materials, site rotation plan, and aftercare), and run it the same way every time before you inject.
Discussion